Beacons amplify module effects across multiple buildings.  Beacon
One beacon with
Beacon
One beacon with  Productivity
speed modules can boost 8 nearby assemblers —if you lay them out correctly.
Productivity
speed modules can boost 8 nearby assemblers —if you lay them out correctly.
How Beacons Work
Beacons transmit module effects to nearby buildings:
- Range: 9 tiles (affects buildings in 9脳9 area)
- Distribution: Effect is split —50% transmission to each building
- Stacking: Multiple beacons stack additively
- Limit: Maximum 12 beacons can affect one building
Key rule: Beacons don't affect other beacons. Only production buildings (assemblers, furnaces, chemical plants, etc.).
The 8-Beacon Layout
The standard endgame layout:
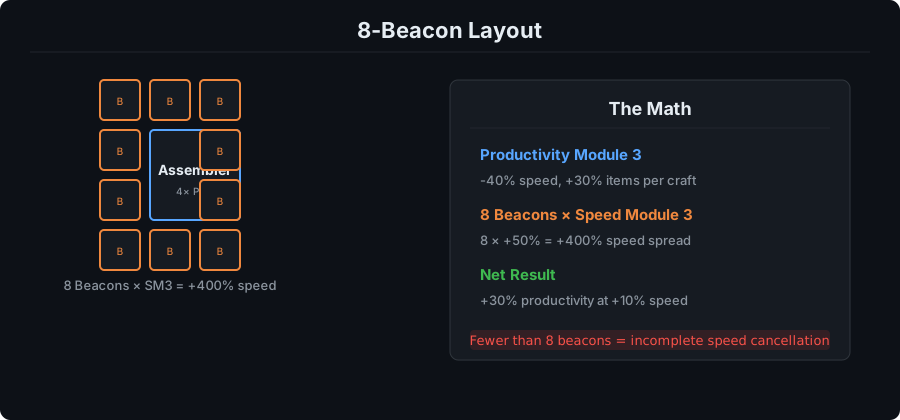
- 1 assembler (3脳3) in center
- 8 beacons surrounding it (in the 12 possible positions, use 8)
- Beacons filled with
Productivity
Speed Module 3 (+50% speed each)
- Assembler filled with
Productivity
Productivity Module 3 (+10% productivity, -40% speed)
The math:
- 8 beacons 脳 +50% speed 脳 50% transmission = +200% speed
- Assembler PM3: -40% speed, +30% productivity
- Net: +160% speed, +30% productivity
Module Combinations
Different goals need different setups:
| Goal | Beacon Modules | Assembler Modules | Result |
|---|---|---|---|
| Max productivity | 8脳 SM3 | 4脳 PM3 | +30% items, +160% speed |
| Max speed | 8脳 SM3 | 4脳 SM3 | +360% speed, 0% productivity |
| Balanced | 8脳 SM3 | 2脳 PM3 + 2脳 SM3 | +15% items, +260% speed |
Recommendation: Use max productivity for expensive recipes (rocket parts, science packs). Use max speed for cheap bulk items (gears, circuits).
Power Cost
Beacons and modules draw massive power:
- Beacon: 480 kW base + module drain
- Speed Module 3: +70% power consumption
- Productivity Module 3: +80% power consumption
8-beacon setup power:
- 8 beacons 脳 480 kW = 3.84 MW
- 8 SM3s 脳 70% = +560% drain
- Total: ~25 MW per assembler
The tradeoff: 25 MW sounds expensive, but +30% productivity means 30% less ore, oil, and processing for the same output. Power is cheap; resources are precious.
What Veterans Learn the Hard Way
- 12-beacon is overkill —8 beacons hits the sweet spot. 12 beacons = marginal gains, massive power cost.
- PM3 first, then beacons —productivity modules reduce resource cost. Speed beacons fix the speed penalty.
- Not for everything —8-beacon setups are overkill for cheap items. Use for expensive recipes only.
- Power grid matters —100 beaconed assemblers = 2.5 GW. Plan your nuclear setup accordingly.
Common Mistakes
| Mistake | Consequence |
|---|---|
| 12-beacon layouts | Diminishing returns, power grid collapse |
| SM3 in assemblers | Wasted productivity potential |
| Beaconed smelters | Furnaces are cheap —beacons are overkill |
| Ignoring power costs | Brownouts when factory scales up |
The Bottom Line
8-beacon layouts with PM3 assemblers and SM3 beacons are the endgame standard. +30% productivity saves resources. Power cost is acceptable at scale. Use for expensive recipes, skip for cheap bulk.
Related: Production Ratios | Oil Processing