When Biters Actually Attack
Biters do not attack on a timer. Three things trigger them:
| Trigger | What Happens |
|---|---|
| Pollution reaches a nest | Biters become aggressive, send a group |
| You destroy a nest | Immediate retaliation from neighbours |
| Evolution factor rises | Bigger waves, more frequent |
Pollution is the one you control. Every machine you build adds to it, and the cloud spreads until it touches a nest.
Step 1: The Wall (Priority 1)
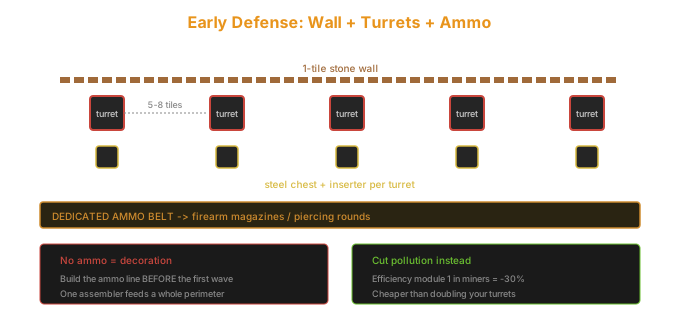
A rough circle of stone walls around your base. One tile thick is enough for the first several hours.
| Property | Value |
|---|---|
| Cost | Stone bricks only - cheap |
| Effectiveness | Biters cannot chew through quickly |
| Thickness | 1 tile early, 2 tiles once waves grow |
| Shape | Circle or rectangle, no need for perfection |
Do not spend hours designing a perfect wall. A sloppy ring beats no ring by a huge margin.
Step 2: Gun Turrets (Priority 2)
Place gun turrets every 5-8 tiles along the wall. Closer means more overlap, which helps against groups.
| Turret | Ammo | DPS | When |
|---|---|---|---|
 Gun turret
Gun turret
Gun turret | Firearm magazine | Low | First hours |
|
Gun turret
Gun turret | Piercing rounds | Medium | Upgrade ASAP |
 Laser turret
Laser turret
Laser turret | Electricity | High | Mid game, power hungry |
 Flamethrower
Flame turret
Flamethrower
Flame turret | Crude oil | Very high | vs large groups |
Gun turrets beat laser turrets early because they need no power infrastructure. A brownout at the wrong moment turns your laser wall off.
Step 3: Ammo Management (Where Bases Die)
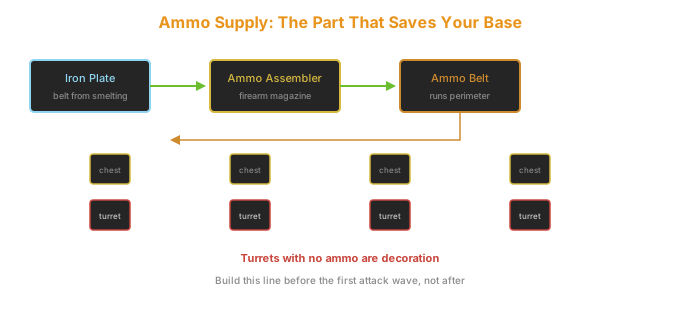
Feed each turret from a steel chest with a nearby inserter.
| Ammo Delivery | Reliability |
|---|---|
| Dedicated ammo belt + chests | Best - set and forget |
| Inserters from a passing belt | Fragile - breaks if belt jams |
| Hand-feeding turrets | Fails within 20 minutes |
| One shared chest for many turrets | Insufficient - runs dry in a wave |
Pollution Control (Defense by Not Being Attacked)
Fewer attacks start with less pollution. This is cheaper than more turrets.
| Method | Effect |
|---|---|
| Efficiency module 1 in miners | -30% pollution |
| Efficiency module 2 in labs | -45% pollution |
 Solar panel
s
Solar panel
Solar panels | Zero-pollution power |
| Nuclear power | Near-zero pollution, huge output - see the nuclear power guide |
| Burning excess wood | More pollution - do not |
Efficiency modules in your mining outposts are the single highest-value defense investment early. Miners are your biggest pollution source.
The Upgrade Path
As your factory grows, defenses evolve in this order:
| Stage | Wall | Turrets | Ammo |
|---|---|---|---|
| First hours | Stone | Gun | Firearm magazine |
| Early base | Stone | Gun | Piercing rounds |
| Mid game | Stone/Steel | Gun + Laser | Mixed |
| Late | Steel | Laser + Flame | Electricity + oil |
| Expansion | Steel | + Artillery | Shells |
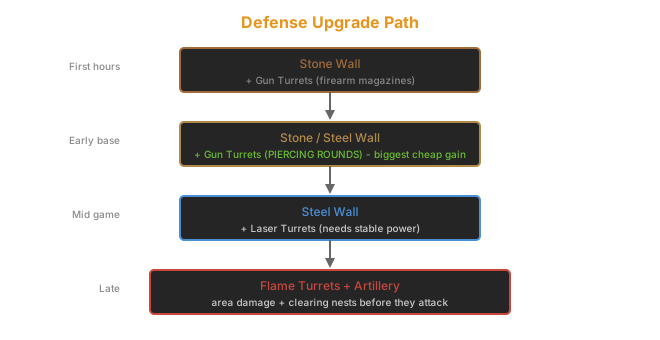
Move to piercing rounds as soon as you can craft them. It roughly doubles your damage for the same turret count, which is cheaper than building twice as many turrets.
Common Early Defense Mistakes
| Mistake | Consequence |
|---|---|
| Turrets with no ammo supply | Wall falls on the first wave |
| Wall with gaps at corners | Biters path straight through |
| Lasers before you have stable power | Wall goes down in a brownout |
| Ignoring pollution | Waves grow faster than your defense |
| Building too big too early | Perimeter you cannot afford to staff |
Do not over-expand early. A small, well-defended base beats a sprawling one with a thin wall you cannot supply.
Related Guides
- https://factorioguides.com/defense/flamethrower-defense-guide/ - the next defense tier
- https://factorioguides.com/defense/artillery-guide/ - clearing nests before they attack
- https://factorioguides.com/getting-started/your-first-factory/ - the base this defense protects
Community Verification and Resources
- Factorio Wiki: Enemies - pollution, evolution, and attack mechanics
- Factorio Wiki: Turret - damage and ammo data
Last updated: 2026-09-26 | Verified against Factorio 2.0.